Capistranoで新規作成したEC2インスタンスにSSH接続する
前回に引き続き、Capistranoで新たに作成したEC2インスタンスにSSHでログインしてみます。
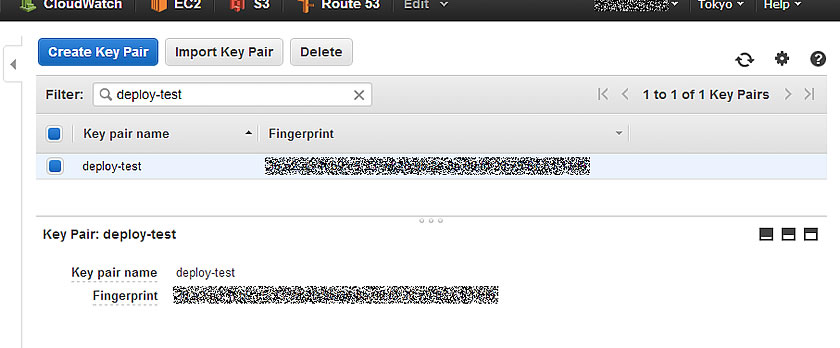
まず、事前準備として、AWS側で新規インスタンス用のキーペアを作成しておきます。AWSマネージメントコンソールの「EC2」メニューから「NETWORK & SECURITY」カテゴリの「Key Pairs」メニューで、キーペアを作成できるので、必要に応じて作成してください。本項の例では、「deploy-test」というCapistranoが稼動しているデプロイ環境用インスタンスで使用しているキーペアを使います。

そして、利用するキーペアのプライベートキーファイル(本項例ではdeploy-test.pemファイル)をCapistranoを実行するデプロイ環境のデプロイを実行するユーザのホームディレクトリ(本項例では/home/deploy-user/)にアップロードしておきます1。 アップロードしたプライベートキーには適切な読み込み権限を付与しておく必要があるので、ファイルのパーミッションを変更します。
$ cd ~
$ chmod 600 deploy-test.pem
$ ls -l *.pem
-rw------- 1 deploy-user deploy-user 1692 Jul  2 10:18 deploy-test.pem
デプロイ設定ファイルconfig/deploy.rbは下記のように修正。
# config valid only for Capistrano 3.1
lock '3.2.1'

# AWS SDK for Ruby を読み込む
require 'aws-sdk'

# AWS SDK用の設定
AWS.config({
  :access_key_id => '<AWS ACCESS KEY ID>',
  :secret_access_key => '<AWS SECRET ACCESS KEY>',
  :region => 'ap-northeast-1',
})

# AMIのimage_id
# Amazon Linux AMI 2014.03.2 (HVM)
set :ami_image_id, 'ami-29dc9228'

# 作成するInstance数
set :instance_count, 2

# 作成するInstanceタイプ
set :ec2_instance_type, 't2.micro'

# 作成先のAvailability Zones
set :availability_zones, [ 'ap-northeast-1a', 'ap-northeast-1c' ]

# 作成先のsubnet_id(必要に応じて)
set :subnet_ids, [ 'subnet-********', 'subnet-********' ]

# 使用するキーペア名
set :key_pair_name, 'deploy-test'

# プライベートキーファイル
set :privert_key_file, 'deploy-test.pem'

# 利用するセキュリティグループID
set :security_groups, [ 'sg-********', 'sg-********', 'sg-********', 'sg-********' ]

# Capistranoデフォルトのタスクを削除する
framework_tasks = [:starting, :started, :updating, :updated, :publishing, :published, :finishing, :finished]
framework_tasks.each do |t|
  Rake::Task["deploy:#{t}"].clear
end
Rake::Task[:deploy].clear

desc 'Launch an EC2 instance to each availability zone different'
task :launch do
  run_locally do
    ec2 = AWS::EC2.new

    created_instances = []
    cnt = 0
    while cnt < fetch(:instance_count) do
      if cnt.even? then
        current_az = fetch(:availability_zones)[0]
        current_sn = fetch(:subnet_ids)[0]
      else
        current_az = fetch(:availability_zones)[1]
        current_sn = fetch(:subnet_ids)[1]
      end
      i = ec2.instances.create(
        :image_id => fetch(:ami_image_id),
        :monitoring_enabled => false,
        :availability_zone => current_az,
        :subnet => current_sn,
        :key_name => fetch(:key_pair_name),
        :security_group_ids => fetch(:security_groups),
        :disable_api_termination => true,
        :instance_type => fetch(:ec2_instance_type),
        :count => 1,
        :associate_public_ip_address => true
      )
      sleep 10 while i.status == :panding
      created_instances << i.id
      cnt += 1
    end
    execute "echo -n #{created_instances} > ~/CREATED_INSTANCES"

  end
end
では、インスタンスラウンチタスクを実行してみます。
$ cap test launch
INFO[3c926533] Running /usr/bin/env echo -n ["i-1c0c351a", "i-cfd209d6"] > ~/CREATED_INSTANCES on localhost
DEBUG[3c926533] Command: echo -n ["i-1c0c351a", "i-cfd209d6"] > ~/CREATED_INSTANCES
INFO[3c926533] Finished in 0.036 seconds with exit status 0 (successful).
作成されたインスタンスの起動をAWSマネージメントコンソールで確認したら、コマンドラインでec2-userでのSSHを試してみます。
$ ssh -i ~/deploy-test.pem ec2-user@176.34.61.235
The authenticity of host '176.34.61.235 (176.34.61.235)' can't be established.
ECDSA key fingerprint is **:**:**:**:**:**:**:**:**:**:**:**:**:**:**:**.
Are you sure you want to continue connecting (yes/no)? yes
Warning: Permanently added '176.34.61.235' (ECDSA) to the list of known hosts.

       __|  __|_  )
       _|  (     /   Amazon Linux AMI
      ___|\___|___|

https://aws.amazon.com/amazon-linux-ami/2014.03-release-notes/
8 package(s) needed for security, out of 18 available
Run "sudo yum update" to apply all updates.
無事に成功しました。
Capistranoで新規作成したEC2インスタンスに対して、SSHアクセスを行う後続タスクを追加してみます。
desc 'Check the activation status of new instances'
task :check do
  created_instances_list = 'CREATED_INSTANCES'

  run_locally do
    ec2 = AWS::EC2.new

    begin
      if test "[ -f ~/#{created_instances_list} ]"
        created_instances = capture("cd ~; cat #{created_instances_list}").chomp
        ci = created_instances.gsub(/(\[|\s|\])/, '').split(',')
        target_instances = ec2.instances.select { |i| i.exists? && i.status == :running && ci.include?(i.id) }.map(&:private_ip_address) #dns_name
        if target_instances.length == 0 then
          raise "No created instances"
        end
        pkfn = fetch(:privert_key_file)
        target_instances.each { |var|
          server var, user: 'ec2-user', roles: %w{web app}, ssh_options: { keys: %W(/home/deploy-user/#{pkfn}), forward_agent: true }
        }
      end
    rescue => e
      info e
      exit
    end

  end
end

task :init => :check do
  on roles(:web) do

    access_log = capture "hostname"
    info access_log

  end
end
新たに作成した「init」タスクでは、まず作成したインスタンスが起動済みであるかをチェックする「check」タスクを実行します。「check」タスクでは、新規作成したインスタンスIDからプライベートIPアドレスを取得して、「WEB、APP」ロールを持つアクセス対象のサーバとしてSSH情報を定義します。この際、Amazon Linuxの初期ユーザ「ec2-user」でのアクセスに対してプライベートキーを付与したログインを行うように設定しています。forward_agentをTRUEにしておかないと、初回SSH時のコンソール対話でアクセスが止まってしまうので注意が必要です。 「check」タスクがOKの場合、「init」タスクが自動で実行されます。こっちのタスクではhostnameコマンドでログインしたそれぞれのサーバのホスト名を出力して終了しています。 では、実際に「init」タスクを実行してみましょう。
$ cap test init
DEBUG[8c9dcda9] Running /usr/bin/env [ -f ~/CREATED_INSTANCES ] on localhost
DEBUG[8c9dcda9] Command: [ -f ~/CREATED_INSTANCES ]
DEBUG[8c9dcda9] Finished in 0.003 seconds with exit status 0 (successful).
DEBUG[c1473094] Running /usr/bin/env cd ~; cat CREATED_INSTANCES on localhost
DEBUG[c1473094] Command: cd ~; cat CREATED_INSTANCES
DEBUG[c1473094]         [i-1c0c351a, i-cfd209d6]
DEBUG[c1473094] Finished in 0.002 seconds with exit status 0 (successful).
DEBUG[1fe95f86] Running /usr/bin/env hostname on 176.34.62.57
DEBUG[1fe95f86] Command: /usr/bin/env hostname
DEBUG[7d485d1a] Running /usr/bin/env hostname on 176.34.61.235
DEBUG[7d485d1a] Command: /usr/bin/env hostname
DEBUG[7d485d1a] Finished in 0.131 seconds with exit status 0 (successful).
DEBUG[7d485d1a]         ip-176-34-61-235
DEBUG[7d485d1a] Finished in 0.131 seconds with exit status 0 (successful).
INFOip-176-34-61-235
DEBUG[1fe95f86] Finished in 0.145 seconds with exit status 0 (successful).
DEBUG[1fe95f86]         ip-176-34-62-57
DEBUG[1fe95f86] Finished in 0.145 seconds with exit status 0 (successful).
INFOip-176-34-62-57
作成した新規インスタンスにCapistnranoで無事SSHログインができました。あとは、それぞれのインスタンス用のデプロイ設定をタスクに追加していくだけです。
次回は新規作成したインスタンスに対して、ec2-user以外のユーザを作成して、そのユーザでSSHアクセスが出来るようにしつつ、デフォルトのec2-userユーザにパスワードを設定してデフォルトユーザでのSSHアクセスには制限を設けるというタスクをCapistranoで設定してみようかと。いつまでも強権限のec2-userユーザでEC2インスタンスにアクセスできるのはセキュリティ的に危険なので、作ったインスタンスに保守用アカウントを作成するのはEC2デプロイの初期設定みたいなものになるかと。
- AWSではキーペアのプライベートキーは、キーペア作成時に1回だけダウンロードでき、それ以外にはプライベートキーファイルを取得できないため、プライベートキーの取り扱いには注意が必要です。 ↩
