
Chefで既存手順のレシピを書く5(munin、zabbix)
...おつかれさまです。小宮です。
前回に引き続き、munin,zabbixの手順のレシピをご紹介します。レシピはこの記事でおしまいです。
記事の最後にはレシピの適用方法を記載します。・muninのレシピ
# cd /opt/src/rpms
# mkdir -p /root/chef-repo/site-cookbooks/munin/files/default/rpms
# mkdir -p /root/chef-repo/site-cookbooks/munin/files/default/var/www/html/munin
# mkdir /root/chef-repo/site-cookbooks/munin/files/default/etc/munin/plugin-conf.d
# cp -p /etc/munin/munin.conf /root/chef-repo/site-cookbooks/munin/files/default/etc/munin/
# scp -Cp xxx-web01:/etc/munin/munin-node.conf /root/chef-repo/site-cookbooks/munin/files/default/etc/munin/
# cp -p /var/www/html/munin/.htaccess /root/chef-repo/site-cookbooks/munin/files/default/var/www/html/munin/
# cp -p /etc/munin/plugin-conf.d/munin-node /root/chef-repo/site-cookbooks/munin/files/default/etc/munin/plugin-conf.d/
# tar cf /root/chef-repo/site-cookbooks/munin/files/default/rpms/munin-node-rpm.tar ./munin-node-rpm/
# tar tf /root/chef-repo/site-cookbooks/munin/files/default/rpms/munin-node-rpm.tar ./munin-node-rpm/
# tar cf /root/chef-repo/site-cookbooks/munin/files/default/rpms/munin-serv-rpm.tar ./munin-serv-rpm/
# tar tf /root/chef-repo/site-cookbooks/munin/files/default/rpms/munin-serv-rpm.tar ./munin-serv-rpm/

# cd /root/chef-repo/site-cookbooks/munin/recipes
# touch munin-node.rb munin-server.rb munin-node-db.rb munin-node-web.rb
# vi munin-node.rb
    filename = "munin-node-rpm.tar"
    cookbook_file "/tmp/#{filename}" do
      source "rpms/#{filename}"
      mode 0644
    end

    package "perl-DBI" do
      not_if "rpm -qa|grep perl-DBI"
      action :install
    end

    script "install_munin-node" do
      not_if 'ls /etc/munin/munin-node.conf'
      interpreter "bash"
      user        "root"
      code <<-EOL
        cd /tmp
        tar xf /tmp/#{filename}
        rpm -i /tmp/munin-node-rpm/perl-Dig*
        rpm -i /tmp/munin-node-rpm/perl-{C*,H*,I*,L*,N*,X*,li*}
        rpm -i /tmp/munin-node-rpm/perl-DBD-Pg*
        rpm -i /tmp/munin-node-rpm/munin-*
        cp -p /etc/munin/munin-node.conf{,.org}
      EOL
    end

    cookbook_file "/etc/munin/munin-node.conf" do
      source "etc/munin/munin-node.conf"
      mode 0644
    end

    script "link_plugins" do
      not_if 'ls /etc/munin/plugins/tcp'
      interpreter "bash"
      user        "root"
      code <<-EOL
        rm -f /etc/munin/plugins/*
        ln -s /usr/share/munin/plugins/cpu /etc/munin/plugins/cpu
        ln -s /usr/share/munin/plugins/if_err_ /etc/munin/plugins/if_err_eth0
        ln -s /usr/share/munin/plugins/if_ /etc/munin/plugins/if_eth0
        ln -s /usr/share/munin/plugins/iostat /etc/munin/plugins/iostat
        ln -s /usr/share/munin/plugins/load /etc/munin/plugins/load
        ln -s /usr/share/munin/plugins/memory /etc/munin/plugins/memory
        ln -s /usr/share/munin/plugins/tcp /etc/munin/plugins/tcp
        ln -s /usr/share/munin/plugins/df /etc/munin/plugins/df
      EOL
    end

    service "munin-node" do
      supports :status => true, :restart => true
      action [ :enable, :start ]
    end


# vi munin-server.rb
    filename = "munin-serv-rpm.tar"
    cookbook_file "/tmp/#{filename}" do
      source "rpms/#{filename}"
      mode 0644
    end

    script "install_munin-serv" do
      not_if 'ls /etc/munin/munin.conf'
      interpreter "bash"
      user        "root"
      code <<-EOL
        tar xf /tmp/#{filename}
        rpm -i /tmp/munin-serv-rpm/*
        cp -p /etc/munin/munin.conf{,.org}
      EOL
    end

    cookbook_file "/etc/munin/munin.conf" do
      source "etc/munin/munin.conf"
      mode 0644
    end

    service "munin-node" do
      supports :status => true, :restart => true
      action [ :enable, :start ]
    end

    cookbook_file "/var/www/html/munin/.htaccess" do
      source "var/www/html/munin/.htaccess"
      mode 0644
    end

# vi munin-node-web.rb
    script "link_plugins_web" do
      not_if 'ls /etc/munin/plugins/apache_accesses'
      interpreter "bash"
      user        "root"
      code <<-EOL
        ln -s /usr/share/munin/plugins/apache_accesses /etc/munin/plugins/apache_accesses
        ln -s /usr/share/munin/plugins/apache_processes /etc/munin/plugins/apache_processes
      EOL
    end

    service "munin-node" do
      supports :status => true, :restart => true
      action [ :enable, :restart ]
    end

# vi munin-node-db.rb
    script "link_plugins_db" do
      not_if 'ls /etc/munin/plugins/mysql_threads'
      interpreter "bash"
      user        "root"
      code <<-EOL
        ln -s /usr/share/munin/plugins/mysql_queries /etc/munin/plugins/mysql_queries
        ln -s /usr/share/munin/plugins/mysql_slowqueries /etc/munin/plugins/mysql_slowqueries
        ln -s /usr/share/munin/plugins/mysql_threads /etc/munin/plugins/mysql_threads
      EOL
    end

    cookbook_file "/etc/munin/plugin-conf.d/munin-node" do
      source "etc/munin/plugin-conf.d/munin-node"
      mode 0644
    end

    service "munin-node" do
      supports :status => true, :restart => true
      action [ :enable, :restart ]
    end
role毎にちがうコマンド実行するとかひとつのレシピ内でやる方法ってあるのかが気になります。ifとかでできるんでしょうか。
今回はそんな方法はわからなかったので、webとdbそれぞれ用のレシピを分けて作りました。
roleに適用する順序は、munin-node.rbを最初にしないとプラグインが最初全部消される仕様です。(レシピは上から順に実行されます)Chefで既存手順のレシピを書く4(DBサーバ)
...おつかれさまです。小宮です。
前回に引き続きdbserverのレシピについて書いていきます。
のこってるのはmunin、zabbxとserverspecでのテストだけです。もうすこしの辛抱です。webと同じくバージョン固定インストールなので、外部レシピは基本的に使わない方向とする
・mysqlのインストールと起動と自動起動の有効化
[shell]# cd /root/chef-repo/site-cookbooks/mysqld/recipes
mkdir -p /root/chef-repo/site-cookbooks/mysqld/files/default/usr/local/src/rpms
mkdir -p ../templates/default/etc/init.d
mkdir -p ../files/default/etc/init.d
mkdir -p ../files/default/root
mkdir -p /root/chef-repo/site-cookbooks/mysqld/files/default/etc/logrotate.d
mkdir -p /root/chef-repo/site-cookbooks/mysqld/files/default/opt/{backup,bin}
scp -Cp xxx-db02:/opt/bin/mysql-back.sh /root/chef-repo/site-cookbooks/mysqld/files/default/opt/bin/
cp -p /etc/logrotate.d/mysqld /root/chef-repo/site-cookbooks/mysqld/files/default/etc/logrotate.d/
scp -Cp xxx-db01:/etc/init.d/mysqld ../files/default/etc/init.d/
scp -Cp xxx-db02:/etc/my.cnf ../templates/default/etc/
cp -p /root/.path_to_file ../files/default/root/
cd /opt/src/rpms/
tar czf /root/chef-repo/site-cookbooks/mysqld/files/default/usr/local/src/rpms/db-rpm.tar.gz ./db-rpm/
tar czf /root/chef-repo/site-cookbooks/mysqld/files/default/usr/local/src/rpms/db-tools-rpm.tar.gz ./db-tools-rpm/
tar tzf /root/chef-repo/site-cookbooks/mysqld/files/default/usr/local/src/rpms/db-rpm.tar.gz
vi ../templates/default/etc/my.cnf
diff /etc/my.cnf ../templates/default/etc/my.cnf
53c53
Chefで既存手順のレシピを書く3(WEBサーバ)
...こんにちは。プラットフォームの小宮です。
前回に引き続き既存手順のレシピ化をすすめていきます。あと3回くらいだと思われるので気長におつきあいください。今回はWEBサーバのレシピになります。
特別なことは特にしていなくて普通のwebサーバだと思いますが、一応何してるか書いておきますと、
apache2.2+php5.3系で中間コードキャッシュにAPCを使っていてwordpressとそのsshプラグインつかっておりAWSのS3にmountしています。
s3mountに使うfuseが最新版からソースコードで入れる必要があり、バージョン固定のphpのパッケージが18個くらいとかありまして
一つ一つpackageリソース書くのが面倒だったこともありましてscriptつかいました。
scriptつかうときはnot_if忘れるとmakeとか何回も実行されて困るので注意が必要です。
あとcd書き忘れると展開場所が認識してるとこに出ないのでその後の手順でファイルが存在しないエラーがでました。・httpdのレシピを書く
設定ファイルの準備をする
[shell]# mkdir -p /root/chef-repo/site-cookbooks/httpd/files/default/rpms # tar cf /root/chef-repo/site-cookbooks/httpd/files/default/rpms/web-rpm.tar ./web-rpm/ # tar tf /root/chef-repo/site-cookbooks/httpd/files/default/rpms/web-rpm.tar ./web-rpm/ # cd /root/chef-repo/site-cookbooks/httpd/recipes # mkdir -p /root/chef-repo/site-cookbooks/httpd/files/default/etc/httpd/{conf,conf.d} # cp -p /opt/src/config/web/httpd.conf /root/chef-repo/site-cookbooks/httpd/files/default/etc/httpd/conf/ # vi /root/chef-repo/site-cookbooks/httpd/files/default/etc/httpd/conf/httpd.conf # mkdir -p /root/chef-repo/site-cookbooks/httpd/files/default/etc/php.d # cp -p /opt/src/config/php/php.ini /root/chef-repo/site-cookbooks/httpd/files/default/etc/ # cd /root/chef-repo/site-cookbooks/httpd/files/default/rpms # wget http://rpms.famillecollet.com/enterprise/5/olds/x86_64/php-pecl-apc-3.1.13-3.el5.remi.x86_64.rpm # cp -p /etc/php.d/apc.ini /root/chef-repo/site-cookbooks/httpd/files/default/etc/php.d/ # wget http://rpms.famillecollet.com/enterprise/5/remi/x86_64/php-pecl-ssh2-0.11.3-2.el5.remi.x86_64.rpm[/shell]
apacheのインストールと基本設定
[shell]# vi httpd-server.rb cookbook_file “/tmp/web-rpm.tar” do source “rpms/web-rpm.tar” mode 0644 endChefで既存手順のレシピを書く2(ユーザ作成)
...こんにちは。プラットフォームの小宮です。
前回に引き続きChefの記事で失礼します。
data_bagsでユーザ管理の用意をします。
一応、以前にこちらに書いてるのですが、関連情報がまとまってるほうがいいと思うので部分的に再掲します。
data_bagsとはldapのような機能をもったデータ検索など管理ができるもの。
chef-server使う場合はサーバと通信してデータ取ってきて反映することが可能。
今回はChef-soloなので、ローカルのファイルにデータを用意して反映させる方法をとります。参考:
もしユーザ数が多くて頻繁にアカウントが追加変更される場合、以下リンクのようにdata_bagsで有効無効も管理するのもよさそうです。
chef-data-bag活用法[shell]# cd ;cd chef-repo/data_bags # mkdir users;cd users # vi xxx-op.json // xxx-op.json { “id” : “xxx-op”, “groups”: [ “xxx-op”,“wheel” ], “uid”: 1000, “username” : “xxx-op”, “home” : “/home/xxx-op”, “shell” : “/bin/bash”, “password” : “$1$Ka.Mw69U$TT5HRfSe7xxxxx” }
# vi yyy-op.json // yyy-op.json { “id” : “yyy-op”, “groups”: [ “yyy-op”,“wheel” ], “uid”: 500, “username” : “yyy-op”, “home” : “/home/yyy-op”, “shell” : “/bin/bash”, “password” : “$1$Ka.Mw69U$TT5HRfSe78Pxxxxx” }
Chef-Soloでレシピを書く前の環境について(Vagrantfile,role,node,data_bags)
...こんにちは。小宮です。
いつのまにか今年の前半が終了しました。宇治金時がおいしい季節になってしまったようです。
それはともかく前回の続きです。 今回はChef-Soloのレシピを書く前の環境の定義などまでを書きます。Chef用語などは軽く解説してる、今日から使い始めるChefを見ていただくか定番の入門Chef Soloを見ていただくのが早いんではないかと思います。
Automated infrastructure is on the menuも英語ですがわかりやすいです。
やりたいこととしては以下のとおりです。
Vagrantfileを書いて仮想インスタンスをたてる
chefレポジトリを作る
chefクックブックを作る
nodeを定義する
roleを定義する
data_bagsを定義する
★今回はここまで★
レシピを書く
レシピをノードに適用する
serverspecテストを書く
テストを実環境に実行するテストの構成:
chef-solo元のadmserver:10.0.0.93
knife-solo適用クライアントwebserver:10.0.0.240
knife-solo適用クライアントdbserver:10.0.0.241
全てCentOS5.8です。・AWSの環境変数を定義
AWSのVPC上なので適宜定義しておきます
[shell]# cd # vi .ec2 export AWS_ACCESS_KEY_ID=****** export AWS_SECRET_ACCESS_KEY=******* export AWS_KEYPAIR_NAME=xxx-key export AWS_PRIVATE_KEY_PATH=/root/.ssh/xxx-key # source .ec2[/shell]・VagrantFileを書く
vagrant initを実行するとVagrantfileができますのでそれを編集し、
VPC上で仮想インスタンスを起動するための設定を書きます。Chefで既存手順のレシピを書く1(初期設定)
...こんにちは。プラットフォームの小宮です。
前回はChefでレシピを書く前のroleやdata_bagsなどの環境定義について書きました。
今回は既存手順のレシピ化ということで淡々と地味に書いていきたいと思います。注意:
scriptリソースを使うときはnot_ifまたはonly_ifを必ず書くこと(複数回実行されないように)
bash内でcdを書き忘れるとtarの解凍先パスがその後のコマンドの指定と一致しなくなるので注意
scriptリソースを使うとエラーがまともに出ないので自分でコマンドをたたいて状況を確認する必要がある
リソースのマニュアルを熟読推奨。クックブック名とその内容は以下の通り。
base_setting 初期設定など ★今回ご紹介するレシピはこちらのみです。
login-users ログインユーザ作成
httpd web関連設定
mysqld db関連設定
munin 統計グラフ設定
zabbix 監視設定レシピを書く
・base_settingのレシピを書く
使いまわしやすさを意識した結果細かく分割して書くことにしました。
☆バックアップディレクトリ作成レシピ
[shell]# cd site-cookbooks/base_setting/recipes/ # for i in bkup_dir hosts sysctl disable ntpd ntpdate mail logrotate ;do touch $i.rb ;done # vi bkup_dir.rb directory ‘/etc/.backup/’ do owner ‘root’ group ‘root’ mode ‘0755’ action :create end[/shell]Chef-SoloとVagrantの導入(VPC環境)
...こんにちは。プラットフォームの小宮です。
最近chef流行ってますね。
せっかくだからこの波に乗ってプロダクト環境に合わせてやってみよう的な記事を書こうかと思います。
さっさとServerspecまでたどり着きたいんですが、今回は導入のみの記事でレシピなどはまた次回以降に。
やってみよう的なレベルなのでリファクタリングし甲斐のあるレシピになる予感がします。さて今回Chef化を試みる環境はVPC上に移行する話になってます。(構成はweb2、db2、stg1、nat1です。ELB利用。soloで十分な感じ。)
Vagrant-awsでVPCつかう方法が可能なようなので、Vagrantを使用して構成管理を行いつつKnife-soloも使うことにします。
vagrantとsahara連携でOSの状態を保存してロールバックということが可能となります。
knife-soloだと/sbin等の下のrubyを消して入れ替えようとしてしまうことがあるらしいので、アプリケーションにおいてrubyを使用しないことを確認しておきます。vagrantを入れるのでruby1.8.7より上のバージョンをrbenvで入れます。
(CentOS5系の場合。6系や他のディストリビューションでは別途ruby -vで確認してください)実は、Chef-Clientを/opt/chefの下に入れた段階で以下のようにPATHを通しておけばrubyのバージョンは気にしなくてもよいかもしれません。
[shell]# curl -L https://www.opscode.com/chef/install.sh | bash # export PATH=$PATH:/opt/chef/embedded/bin/ # vi ~/.bashrc PATHをとおしておく[/shell] gemでchefを入れるのは古いやりかたみたいですね。・最初にOracleVirtualBoxを導入
入れる理由はVagrant-awsでインスタンスの起動と管理を行うため。
[shell]cat /etc/redhat-release CentOS release 5.8 (Final) yum install libXmu libXt mesa-libGL qt qt-x11 SDLwget http://download.virtualbox.org/virtualbox/4.2.12/VirtualBox-4.2-4.2.12_84980_el5-1.x86_64.rpm rpm -ivh VirtualBox-4.2-4.2.12_84980_el5-1.x86_64.rpm[/shell]
・ruby-1.8.7より新しいバージョンを導入(必要な場合)
[shell]yum -y install zlib-devel readline-devel openssl-devel yum install ruby ruby-devel rdoc irb rubygems yum install git –enablerepo=rpmforge[/shell]
rbenvのインストール
[shell]git clone git://github.com/sstephenson/rbenv.git ~/.rbenv[/shell]
rbenvのパスを設定する為に以下2行追記
[shell]vi ~/.bashrc export PATH="$HOME/.rbenv/bin:$PATH" eval “$(rbenv init -)” source ~/.bashrc[/shell] ここでのPATHは各環境に合わせてください(rbenvで入れない場合は/opt/chef/embedded/binに通す等)AmazoneSESを使ってメール送信する(SMTPリレー)
...こんにちは。プラットフォームの小宮です。 ちょっと前にAmazoneSESを使ってSMTPリレーでメール送信の設定をしたのでその記録を公開させていただきます。
※SDKでなくSMTPリレーのほうを試します。(SDKつかうにはサーバにruby入っていてruby使う必要があるため。)
★SESの申し込みをする SESのサービスダッシュボードに「RequestProductionAccess」というボタンがあるのでそれを押すと お問い合わせ画面が出てくるので、必要な内容を入力する (名前とサービスドメインとメールアドレスとメールの用途など) Request Production Access to Simple Email Service(お問い合わせ) 入力送信すると、 リクエストありがとう、1日も早く使えるように審査するからマニュアル読んでお待ちください と英文メッセージが出る。
申請の翌日SESのダッシュボードを確認したところ、以下の標記になっていた
Your Amazon SES Sending Limits
Sending Quota: send 10000 emails per 24 hour period
Quota Used: 0% as of 2013-03-08 10:53 UTC+9
Max Send Rate: 5 emails/second
24時間に10000通まで送ることが可能 現在の使用率は0% 最大送信レートは秒間5通
送信元は以下と教えていただいた → 会員登録時「no_reply@hoge.jp」というメールを送信、 問合せ時「support@hoge.jp」というメールを受信(転送)、
裏セグメントからyumやwget等したい場合の設定
...裏セグメントのホスト(たとえばVPCのEIPついてないのとかDBやNASなど裏においときたいやつ) から名前解決とかメールとかyumとかwgetとか時刻同期とかメールしたい! という場合の設定についてざっくりまとめさせていただきます。
とりあえず2パターンあります。 NATする(AWSの場合NATインスタンスを使う)パターンと、 グローバル通信できる管理サーバにソフトウェアを入れて解決するパターン。
★NATする(AWSの場合NATインスタンスを使う)パターン
db側はInternetGatewayつけてなくてパブリックでなくローカルなルーティングな場合、 名前解決をはじめ外に出られないです。(※) NATインスタンスを作るのも勿体ないと、複数NICがついたwebをnat化しようとしたところ、 マルチインタフェースなインスタンスはNATの出口に出来ない模様でした。 (※)最近新しくとったアカウントはVPCオンリーになっていてそちらだとグローバルIPがどんどん勝手に振られるようです。。(EIPつけざるをえない仕様)
NATインスタンス作成方法は以下URLから Amazon VPCトレーニング-NATインスタンスの作成方法 VPC詳細 -ほぼ週刊AWSマイスターシリーズ第7回- Amazon VPCでNATを使ってPublic SubnetとPrivate Subnetを分ける
一番上のスライドのとおりでnatインスタンスを作成可能。 ざっくりいうと、 VPCサブネットをつくり、 “ami-vpc-nat"AMIでNATインスタンスを作成し、 NATインスタンスの"Change Source/DestCheck"をDisableにし、 NATインスタンスにEIPをアソシエートし、 PublicSubnetのRouterTableにNATインスタンスのIDを追加し、 必要に応じてNATインスタンスのSecurityGroupを設定する
そのほか、一般的なルータ化設定方法と同様に、 インスタンス作成後にiptablesでnatのルール設定が必要になる模様。
/sbin/iptables -t nat -A POSTROUTING -o eth0 -s 10.0.0.0/16 -j MASQUERADE
service iptables save
iptables --list -t nat
上記スライドのとおりNATインスタンスをデフォルトゲートウェイにするルーティング設定も必要 forwardingの設定も必要
瀕死の技術ブログを復旧した話
...こんにちわ。
今回は主に(当ブログの)mysqlデータベース復旧のお話になります。
担当のお方が
「waordpressだとinnodbよりmyisamのほうが早いらしいので、
変える前にinnodbのmy.cnfのパラメータいじくってベンチマークとろうとした」
ことをきっかけにDBのデータがぶっ壊れました。
mysql5.6ならmyisam使わなくても参照専用トランザクション使うよう改造できれば早いらしいよという話はおいといて。(5.5だし)
DBデータが読めなくてwordpressの管理画面にログインできなくなってしまいました。-————————————————– 130528 11:59:24 [ERROR] Missing system table mysql.proxies_priv; please run mysql_upgrade to create it
130528 11:59:24 [ERROR] Native table ‘performance_schema’.’events_waits_current’ has the wrong structure
130528 11:59:24 [ERROR] Native table ‘performance_schema’.’events_waits_history’ has the wrong structure
130528 11:59:24 [ERROR] Native table ‘performance_schema’.’events_waits_history_long’ has the wrong structure
130528 11:59:24 [ERROR] Native table ‘performance_schema’.‘setup_consumers’ has the wrong structure
130528 11:59:24 [ERROR] Native table ‘performance_schema’.‘setup_instruments’ has the wrong structure
130528 11:59:24 [ERROR] Native table ‘performance_schema’.‘setup_timers’ has the wrong structure
130528 11:59:24 [ERROR] Native table ‘performance_schema’.‘performance_timers’ has the wrong structure
130528 11:59:24 [ERROR] Native table ‘performance_schema’.’threads’ has the wrong structure
130528 11:59:24 [ERROR] Native table ‘performance_schema’.’events_waits_summary_by_thread_by_event_name’ has the wrong structure
130528 11:59:24 [ERROR] Native table ‘performance_schema’.’events_waits_summary_by_instance’ has the wrong structure
130528 11:59:24 [ERROR] Native table ‘performance_schema’.’events_waits_summary_global_by_event_name’ has the wrong structure
130528 11:59:24 [ERROR] Native table ‘performance_schema’.‘file_summary_by_event_name’ has the wrong structure
130528 11:59:24 [ERROR] Native table ‘performance_schema’.‘file_summary_by_instance’ has the wrong structure
130528 11:59:24 [ERROR] Native table ‘performance_schema’.‘mutex_instances’ has the wrong structure
130528 11:59:24 [ERROR] Native table ‘performance_schema’.‘rwlock_instances’ has the wrong structure
130528 11:59:24 [ERROR] Native table ‘performance_schema’.‘cond_instances’ has the wrong structure
130528 11:59:24 [ERROR] Native table ‘performance_schema’.‘file_instances’ has the wrong structure
130528 11:59:24 [Note] Event Scheduler: Loaded 0 events
130528 11:59:24 [Note] /usr/libexec/mysqld: ready for connections.
Version: ‘5.5.30-log’ socket: ‘/var/lib/mysql/mysql.sock’ port: 3306 MySQL Community Server (GPL) by Remi
130528 11:59:50 [ERROR] Cannot find or open table xxxxxx_db/dl_options from
the internal data dictionary of InnoDB though the .frm file for the
table exists. Maybe you have deleted and recreated InnoDB data
files but have forgotten to delete the corresponding .frm files
of InnoDB tables, or you have moved .frm files to another database?
or, the table contains indexes that this version of the engine
doesn’t support.
See http://dev.mysql.com/doc/refman/5.5/en/innodb-troubleshooting.html
how you can resolve the problem.);
-————————————————–AmazonEBSでraid0を組んだ時のパフォーマンス検証
...AmazonEBSでraid0を組んだ時のパフォーマンス検証
EBSを組むと早いはなしを検証したい
testでマルチ、ラージなら結構こうかある説がある模様。
既存移行の方法も検討(バイナリログ等のディレクトリ分けるところからかと。)公式のユーザガイド(EBSPerformance)
EBS自体が冗長構成組まれているのでraid0でいいと思われる。インスタンスディスク(ローカルディスク、エフェメラルディスク)を使ってRAID0
EBSでRAID0を組むことは、RAID10(ミラーのストライプ)と同等であるLargeインスタンス以上であれば、1台よりも2台の方がディスクI/O性能が目に見えて上がりました
エフェメラルディスク(stopすると消えるほうのディスク)でraid0したい場合の起動コマンド例
[shell] ec2-run-instances ami-e965ba80 –region us-east-1 –key id_rsa –group sg-a4866fcc –placement-group test –instance-type cc2.8xlarge -b “/dev/sdb=ephemeral0” - b “/dev/sdc=ephemeral1” -b “/dev/sdd=ephemeral2” “/dev/sdf=ephemeral3” [/shell] ・ラージでEBSディスクを2つ追加して起動してログインする
[shell] # df -h Filesystem Size Used Avail Use% Mounted on /dev/xvde1 9.9G 867M 8.5G 10% / none 3.7G 0 3.7G 0% /dev/shm # ls -l /dev/xv* brw-rw—- 1 root disk 202, 65 Mar 21 02:15 /dev/xvde1 brw-rw—- 1 root disk 202, 80 Mar 21 02:15 /dev/xvdf brw-rw—- 1 root disk 202, 96 Mar 21 02:15 /dev/xvdg find /dev -type b -print [/shell] してみたがそれらしい名前のは上記のみ。MHAの動作確認と切替検証
...MHAの動作確認と切替検証
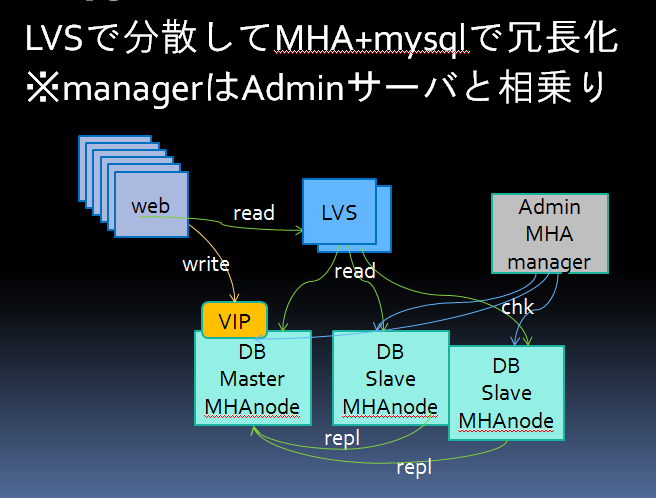
前回のつづきです。以下の図のように切り替わるようテストします。 ※本検証はマスタ1台、スレーブ2台、マネージャ1台構成。(多段構成は中間ノード障害時の復旧が猥雑になるので回避)
スレーブにmanagerを同居させるとpurge_relay_logsとかぶると上手く切り替わらない可能性があるようです。
※2台しかない場合で上手く切り替わらないことがあるようです。以下参考。
http://heartbeats.jp/hbblog/2013/05/mysql-mha-haproxy.html⑥ 起動前チェック
・sshの動作チェック
[shell] # masterha_check_ssh –conf=/etc/app1.cnf [/shell] OKな場合最終的に以下のように出力される
[shell] Tue Oct 23 15:02:22 2012 - [info] All SSH connection tests passed successfully. [/shell]
・replicationの動作チェック
[shell] # masterha_check_repl –conf=/etc/app1.cnf [/shell] OKな場合最終的に以下のように出力される(※mysql5.6からはMHAのバージョンによってはbinlog-checksum=NONEにしないとここで失敗するかもしれません)
[shell] MySQL Replication Health is OK. [/shell] ※失敗するパターン
レプリケーションのフィルタリングルールが合っていない
LVSとMHAマネージャが相乗りの場合、チェックタイミングが重複しホスト毎DBサーバに拒否されてしまう(要flush hosts;)MHA(MasterHighAvailabilityManager)の導入設定
...MHA(MasterHighAvailabilityManager)の導入設定 使用バージョン:mha4mysql-manager-0.53-0、MySQL-5.5

①簡単な利点などの解説
MHAとはmysqlのマスタ障害時に最新のスレーブをマスタとして他のスレーブの差分を補完しマスタの向き先を変えてくれるプロダクト。
Heartbeat+mon+mysqlに比べるとreplicationの再構成も行ってくれるので切り替わってもDBがシングルにならないのが利点。(3台以上の構成の場合)作者のスライド
公式サイト
MHAの制約:mysql5.0以上、SBR(ステートメントベースレプリケーション)の場合LOAD DATA INFILEを使えない
※マネージャはadminサーバ、ノードはDBサーバ(マスタ・スレーブ共通)② マネージャにてインストール ※以下、admサーバから実施
・インストール
[php]wget http://mysql-master-ha.googlecode.com/files/mha4mysql-node-0.53-0.noarch.rpm
wget http://mysql-master-ha.googlecode.com/files/mha4mysql-manager-0.53-0.noarch.rpm
yum –enablerepo=rpmforge install \
perl-Config-Tiny \ perl-Time-HiRes \ perl-Log-Dispatch \ perl-Parallel-ForkManager \ perl-Params-Validate
yum install perl-DBD-MySQL
rpm -ivh mha4mysql*
[/php] 入ってなかったら
[shell]yum install –enablerepo=remi mysql mysql-server perl-DBD-MySQL[/shell] ※マネージャはmysql-serverいらないかも
③ ノードにてインストール ※以下、dbサーバから実施
[shell]